Building Checkin User Guide
This guide provides an overview of product features and related technologies. In addition, it contains recommendations on best practices, tutorials for getting started, and troubleshooting information for common situations.
Table of Contents
- Getting Started
- Building Selection
- Academic Building Check-in
- Recreation and Wellness Center
- Dormitory Check-in
- Menu Options
- Settings Configuration
- Troubleshooting
- Keyboard Shortcuts
Getting Started
System Requirements
- Windows operating system
- .NET Framework
- SQL Server database access
- Card reader (optional - manual entry available)
Starting the Application
- Double-click the
Building_Checkin.exefile - The system will open to the Building Selection screen
- If you've used the system before, it may automatically open to your last selected building
Installation
- Setup: Double-click
setup.exeto install the program - Location: After installation, the program can be found under Start > All Programs > IWU
- First Launch: The first time you launch the program, you'll be prompted to select a default building
First-Time Setup
- Operator ID: You'll need to enter your operator ID when prompted
- Building Access: Ensure you have permission to access the buildings you need to monitor
- Card Reader: Test your card reader to ensure it's working properly

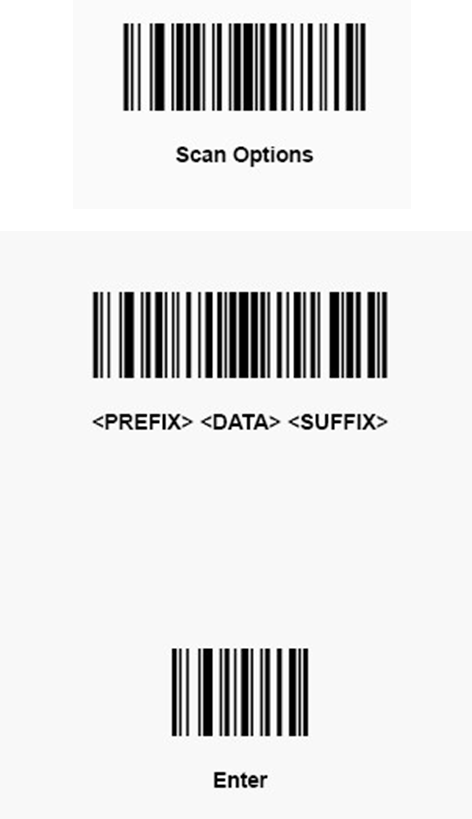
Scanner Setup
- Barcode Programming: Print the barcode page (at the end of this documentation)
- Scan Order: Scan each barcode from top to bottom
- Verification: Test the scanner after programming to ensure it's working correctly
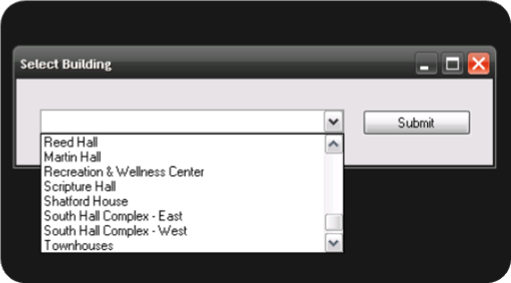
Building Selection
Selecting a Building
- Building Dropdown: Click the dropdown arrow next to "Select Building"
- Choose Building: Select the building you want to monitor from the list
- Submit: Click the "Submit" button to proceed
Building Types
- Academic Buildings: General purpose buildings (libraries, classrooms, etc.)
- Recreation and Wellness Center: Fitness facilities with special guest categories
- Dormitories: Student housing with curfew monitoring
Building Memory
- The system remembers your last selected building
- When you restart the application, it will automatically open to that building
- You can change buildings at any time using the menu
- Default Building: The first time you launch the program, you'll be prompted to select a default building
- Changing Default: The default building can be changed under the Options menu
Academic Building Check-in
Main Interface
The Academic Building interface displays:
- Current Building: Shows which building you're monitoring
- Operator ID: Your staff identification number
- Scan Text Box: Where card scans are processed
- Data Grid: Shows current check-ins with columns for:
- ID: Student/visitor ID number
- Name: Person's name
- Time In: Entry time
- Time Out: Exit time (shows "-" if still checked in)
- Operator: Staff member who processed the entry
- Location: Room assignment (if applicable)
- Notes: Additional information
Check-in Process
-
Operator ID Required: Before any scans, you must enter your Operator ID (see First-Time Setup)
-
Card Scan: Have the student/visitor scan their ID card
- The card reader should automatically send the ID to the scan text box
- If the card reader isn't working, use manual entry (see below)
-
System Processing: The system will:
- Verify the person has permission to enter the building
- Record the entry time
- Display the person's name in the data grid
- Show a confirmation message
-
Manual Entry (if card reader fails):
- Click the "Manual Input" button
- Enter the student/visitor ID number
- Press Enter to process
Note: If you attempt to perform a scan without an Operator ID entered, the program will cancel the scan and prompt you for your ID.
Check-out Process
There are three ways to check out a student or patron:
- Card Scan: Have the person scan their card again
- Manual Entry: Input their ID using Manual Scan button
- Grid Click: Click on the Time Out cell in the grid view
Note: The system will ask for confirmation before recording the exit time.
Guest IDs
For visitors without individual IDs, use:
- 1111111: Guest-Visitor
Note: Guest IDs will display the category name rather than individual names. Only registered students and employees with unique IDs will show their actual names in the system.
Adding Notes
- Select Entry: Click on a person's entry in the data grid
- Add Notes: Right-click and select "Add Notes"
- Enter Information: Type any relevant notes
- Save: Click OK to save the notes
Recreation and Wellness Center
Main Interface
The Recreation and Wellness Center interface is similar to Academic Buildings but includes special features for fitness facilities:
- Current Building: Shows "Recreation and Wellness Center"
- Operator ID: Your staff identification number
- Scan Text Box: Where card scans are processed
- Data Grid: Shows current check-ins with the same columns as academic buildings
- Special Guest Categories: Enhanced support for recreation-specific visitors
Check-in Process
-
Card Scan: Have the person scan their ID card
- Students and employees: Normal card scanning process
- Guests and family members: Use appropriate guest IDs
-
System Processing: The system will:
- Verify the person has access to the recreation center
- Record the entry time
- Display the person's name or guest category
- Show a confirmation message
-
Manual Entry (if card reader fails):
- Click the "Manual Input" button
- Enter the person's ID number or guest ID
- Press Enter to process
Check-out Process
There are three ways to check out a student or patron:
- Card Scan: Have the person scan their card again
- Manual Entry: Input their ID using Manual Scan button
- Grid Click: Click on the Time Out cell in the grid view
Note: The system will ask for confirmation before recording the exit time.
Guest Categories
The Recreation and Wellness Center supports these guest categories:
- 1111111: Guest-Visitor (general visitors)
- 1111112: Facility Club (facility club members)
- 1111113: Walking Club (walking club members)
- 1111114: Swimming Club (swimming club members)
- 1111115: Family Rec Pass (family recreation passes)
Family Recreation Passes
Important Information:
- ID: Use 1111115 for all family recreation passes
- Display: Shows as "Family Rec Pass" in the system
- Privacy: Individual family member names are not displayed
- Usage: Any family member can use the same pass ID
Processing Family Passes
- Family Member Arrives: Family member presents their recreation pass
- Staff Entry: Enter ID 1111115 (either manually or via card scan)
- System Records: System records entry as "Family Rec Pass"
- Check-out: Same process for exit
Guest Categories Explained
- Guest-Visitor (1111111): General visitors to the recreation center
- Facility Club (1111112): Members of facility-specific clubs
- Walking Club (1111113): Members of walking programs
- Swimming Club (1111114): Members of swimming programs
- Family Rec Pass (1111115): Family recreation pass holders (see Family Recreation Passes section below)
Adding Notes for Recreation Center
- Select Entry: Click on a person's entry in the data grid
- Add Notes: Right-click and select "Add Notes"
- Enter Information: Type relevant notes (e.g., "Using pool", "Fitness class", "Guest of student")
- Save: Click OK to save the notes
Special Considerations
- Equipment Check-out: Add notes if equipment is borrowed
- Class Participation: Note if person is attending a specific class
- Guest Information: Record if someone is a guest of a student/employee
- Facility Usage: Note which areas of the center are being used
Dormitory Check-in
Main Interface
The Dormitory interface includes all Academic Building features plus:
- East/West Selection: Radio buttons for buildings with wings
- Curfew Monitoring: Automatic late arrival detection
- Chaperone Tracking: For supervised visits
- Gender-Specific Rules: Enforces building gender policies
Wing Selection (if applicable)
Some dormitories have East and West wings:
- Select Wing: Choose "East" or "West" radio button
- System Updates: The system will track which wing the person is visiting
Curfew Monitoring
- Late Detection: System automatically identifies late arrivals
- Curfew Times: Varies by day of the week
- Late Reports: Generate reports of late arrivals
Chaperone Entry
- Student Scan: Have the student scan their card first
- Chaperone Scan: Have the chaperone scan their card
- System Links: The system will link the chaperone to the student
- Room Assignment: You will be prompted to enter the room where the chaperone and guest will be spending their time
Note: The room entered for the location does not have to be the chaperone's room. Instead, it should be the room where the chaperone and guest will be spending their time.

Opposite Gender Visits
- Permission Check: System verifies cross-gender visit permissions
- Time Limits: May enforce time restrictions
- Reports: Generate reports of cross-gender visits
Menu Options
Reports Menu
Dormitories:
- Not Checked In: Shows any students with a curfew that have not checked in for the night
- Opposite Gender: Shows any students who are not the same gender as the dorm who have yet to check out
Academic Buildings:
- Late Report: Shows everyone who has checked into a building and has yet to check out
Options Menu
- Change Operator: Switch to a different operator ID
- Change Building: Return to building selection screen
- Settings: Configure system preferences
Help Menu (Dormitories only)
- Curfew: View current curfew times and policies
- About: Application information and version
Settings Configuration
Accessing Settings
- Menu Bar: Click "Options" → "Settings"
- Settings Window: Configure your preferences
Available Settings
Location Selection
- Enabled: System will prompt for room/location assignment
- Disabled: Skip location assignment (faster processing)
Timeout Confirmation
- Enabled: System asks for confirmation before checkout
- Disabled: Automatic checkout without confirmation
Saving Settings
- Make Changes: Check/uncheck the desired options
- Save: Click the "Save" button
- Close: Settings are automatically applied
Troubleshooting
Common Issues
Card Reader Not Working
Problem: Card scans aren't being detected Solutions:
- Check card reader connections
- Use manual entry as temporary solution
- Restart the application
- Contact IT support if problem persists
Database Connection Error
Problem: "Database connection failed" message Solutions:
- Check network connection
- Verify SQL Server is running
- Contact system administrator
- Try restarting the application
Permission Denied
Problem: "Access denied" when scanning card Solutions:
- Verify the person has building access
- Check if their ID is active
- Contact housing/security office
- Use guest ID if appropriate
System Freezes
Problem: Application becomes unresponsive Solutions:
- Wait 30 seconds for system to respond
- Close and restart the application
- Check for database connectivity issues
- Contact IT support
Error Messages
"Invalid Card ID"
- The scanned ID is not in the database
- Verify the card is valid
- Contact the card office if needed
"Academic Building - Invalid Permissions"
- If a person without building permissions attempts to check in, a pop-up will display
- The program will still enter their scan for statistical tracking
- It is up to the operator to check the patron out by clicking the Time Out cell

"Family Pass Usage"
- Family recreation passes (ID 1111115) will show as "Family Rec Pass" in the system
- Individual family member names are not displayed for privacy and simplicity
- If you need to track individual family members by name, they must be registered with unique IDs
"No Permission for Building"
- The person doesn't have access to this building
- Check building assignments
- Contact housing office
"Already Checked In"
- The person is already recorded as being in the building
- Check if they need to check out first
- Look for duplicate entries
Keyboard Shortcuts
General Navigation
- Tab: Move between fields
- Enter: Process current input
- Escape: Cancel current operation
- F5: Refresh data grid
Menu Access
- Alt + R: Reports menu
- Alt + O: Options menu
- Alt + H: Help menu (dormitories)
Data Grid
- Up/Down Arrows: Navigate rows
- Enter: Select row
- Delete: Remove entry (if permitted)
Grid View Options
Grid view options are performed by clicking on specific cells in the grid view:
- Time Out: Click this cell to check out the student or patron corresponding to the row
- Room: Click to edit the room the student or patron will be in
- Notes: Click to enter specific notes about a scan

Best Practices
Daily Operations
- Start of Shift: Verify operator ID is correct
- Building Selection: Double-check you're monitoring the right building
- Card Reader Test: Test with your own card before starting
- Regular Checks: Monitor the data grid for unusual activity
Data Management
- Accurate Entry: Ensure all information is entered correctly
- Notes: Add notes for special circumstances
- Verification: Double-check IDs when manually entering
- Cleanup: Report any duplicate or incorrect entries
- Guest Categories: Use appropriate guest IDs for visitors (1111111 for general guests, recreation-specific IDs for the Recreation Center)
- Name Display: Understand that guest IDs show category names, not individual names
Security
- Operator ID: Don't share your operator ID
- Logout: Close the application when not in use
- Privacy: Don't leave the system open unattended
- Reporting: Report any suspicious activity
Communication
- Clear Instructions: Give clear directions to students/visitors
- Patience: Allow time for card processing
- Assistance: Help users who are having trouble
- Documentation: Keep notes of any issues or special cases
Support Information
Contact Information
- IT Support: [Insert IT support contact]
- Housing Office: [Insert housing office contact]
- Security Office: [Insert security office contact]
Emergency Procedures
- System Down: Use paper logs as backup
- Card Reader Failure: Use manual entry
- Database Issues: Contact IT immediately
- Security Concerns: Contact campus security
Training Resources
- User Training: Available through IT department
- Online Documentation: [Insert documentation URL]
- Video Tutorials: [Insert tutorial links]
Barcode Programming
Scanner Setup
To program the scanner:
- Print Barcodes: Print the barcode page (see below)
- Scan Order: Scan each barcode from top to bottom
- Test: Verify the scanner is working correctly after programming
Barcode Page