Getting Started
Overview
The basics of creating a video in the One Button Studio. No experience required!Using the One Button Studio
After you have reserved the one button studio, simply bring a flash drive (preferably with at least 1gb of free space) to the studio, and you are ready to go! It's pretty simple:
You will also see the instructions appear on the screen. Simply follow the prompts to create your own video!
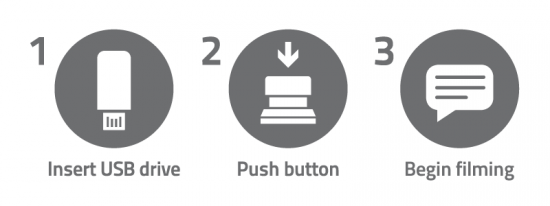
Step 1: Insert USB drive.
When you insert your flash drive, the camera will automatically turn on.
Step 2: Push button.
When instructed, press the big red button. You’ll receive a 5-second countdown before the camera begins recording.
Step 3: Begin filming.
Now that you don’t have to worry about setting up the lights and camera, you can focus on what you have to say. . . so make it good!
Step 4: Push button / remove drive.
When you’re finished, press the button one more time to stop recording and save your video to your USB drive. WAIT to remove your drive until the on-screen prompt says it’s ok.
What if I need assistance?
If you have any questions, or need any assistance, feel free to inquire at the Media Services desk, and a student worker or IMT staff member will be able to assist you.
What can I do with my video when I am finished?
It is completely up to you what to do with your media content. You may want to do some basic editing or burn your video to a DVD. This is all able to be accomplished on the PCs provided on the lower level of the Jackson Library. Blank media is available for purchase at the Media Services desk.
If you are IWU faculty, you have access to "My Media" at media.indwes.edu. Here you can upload and share your video content with students, colleagues, and others. Here's how:
1. Go to media.indwes.edu and click on "Add new."
Select "Media Upload." You may be prompted to login. Use the same login that you use for the Portal.
2. Click on the "Choose a file to upload" button.
Locate the video file you created.
3. Give your video a name and a description.
Fill out the fields for your video, and add tags if desired.
4. Select "Unlisted" from the three options that appear.
This will allow people to view your video, but only if you provide them with a link.
5. Click the "Save" button.
The screen will refresh, and you should see the link that says, "Go To Media." Click on that link.
6. Copy the link in the address bar.
The link that now appears in the address bar of your browser can be copied and sent via email, pasted in your learning studio course, and distributed however you see fit.
That's it! If you have any issues with your video file, BrightSpace, or the My Media site, contact support@indwes.edu.