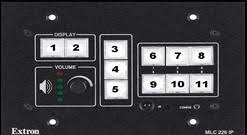
Standard Teaching Station Control

Button Key:
1. Display On- Press this button to turn on the projector and/or flat panel display, and show the image from the selected source (buttons 6-10).
2. Display Off- Press this button to turn off the projector. Always use this button to shut down the projector after you are done using it.
3. Display Mute- Pressing this button will temporarily black out the display from the projector, but does not shut it off.
4. No function. (These buttons may provide added functions in rooms with special features, but will be labeled appropriately).
5. No function. (These buttons may provide added functions in rooms with special features, but will be labeled appropriately).
6. PC- Press this button to display the desktop PC in the teaching station, onto both the monitor and the projection screen. Ensure the PC is powered on by pressing the PC's front panel power button.
7. Laptop 1- Press this button to display any source that is plugged into the VGA cable, labeled Laptop 1. 
8. Laptop 2- Press this button to display any source that is plugged into the HDMI cable, labeled Laptop 2. 
9. Blu-Ray- Press this button to display any video and audio played from the DVD or Blu-Ray using the Blu-Ray player that is installed in the teaching station. Ensure the BluRay player is powered on. Disc menu navigation and advanced features must be controlled using the provided wireless remote control.
10. Document Camera- This button will display the video image being captured by the document camera that is on the teaching station side shelf. Ensure the document camera is powered on.
*NOTE* With upgrades to the classrooms, we are also standardizing the button labels. Below is a list that corresponds to the numbered buttons on the picture above. If a teaching station (smart-cart) does not contain a particular source, the corresponding button will have no function.
6: Laptop VGA
7: Blank
8: PC
9: Laptop HDMI
10: Blu-Ray
11: Doc Cam
Instructions:
1. Press the "Display On" button (1) and wait for the projector to display the source that is chosen (usually PC at first). Make sure that the source and the monitor built into the cart are both powered on as well.
2. Once the monitor and projector are powered on, choose the source that you would like to share. Make sure that all cables are connected correctly and that the chosen source is powered on.
3. To adjust the volume of your source, turn the volume knob on the controller clockwise until the audio is the correct volume. Make sure the audio is also adjusted correctly on your source.
4. After you are finished using the teaching station, press the Display Off button (2) to turn off the projector. Do not turn off the computer or the BluRay player, as they will enter power-save mode automatically.
